create your own darkcloud
Contents
Intro
- what is a darkcloud? most people have heard of a darknet; a darkcloud can utilize aspects of darknets but applies more specifically to your own services
- as a self-hosting proponent, darkclouds make your various services and data available to you and chosen others in an authorized and private fashion
- one of the main reasons is to make services easily accessible while still making sure that security is considered; done properly, it’s harder for an attacker to hack what they’re unable to reach
- it can sometimes makes sense to roll-your-own cloud, access to computing power is extremely cheap, though electricity is a cost concern
- the internet itself has whole other hidden components
Components
- Tailscale - a mesh VPN framework
- Tipi - a containerized application management interface
- Syncthing - a folder replication application
- Uptime Kuma - a monitoring service for other services
Tailscale
- start with almost any kind of computer; for example, I have some Lenovo M600 Tiny PCs and virtual machines, but even something like a Raspberry Pi can be used
- Install Linux; I use Ubuntu but most flavors of Linux should work fine; of course if you’re using a Pi, you’ll be using Raspbian OS
- Once Linux is installed, sign up for Tailscale via tailscale.com/login
- Tailscale has apps for Linux, macOS, Windows, iOS, Android, even Apple’s tvOS as of recently; as a personal user of Tailscale, I sign into it with GitHub
- Tailscale is based off of WireGuard
- there are other platforms like Headscale which is fully self-hosted but I landed on Tailscale and its free tier has served my needs well enough
- Tailscale uses what’s termed as the CG-NAT space within IP addressing which is the subnet of 100.64.0.0/10 (the range of 100.64.0.0 to 100.127.255.255); this range is not publicly routable on the Internet
- You’ll also want to turn on MagicDNS within Tailscale as this helps to remember names of devices instead of an IP address; when setting up, you’ll essentially roll two random words that will be used for your MagicDNS so roll until you find something memorable or funny! Mine is “risk-mermaid” (MagicDNS names aren’t private and don’t need to be; in fact, if you use the Tailscale certs feature, the certificates details are published to a public ledger, however only devices within your tailnet will be able to resolve from this domain into an IP address)
Tipi
- Install Tipi on your host from runtipi.io by running:
curl -L https://setup.runtipi.io | bash - Tipi is an application deployment manager for Docker and has its own app store (the apps are free and apps are regularly added and updated); when you install an app via Tipi, it is essentially deploying that app via Docker
- Once Tipi has installed, go to the machine’s Tailscale hostname or IP address in a web browser, which will ask to initially setup a username and password to access Tipi
- Once logged in, you can go to the Apps tab and search for an app you’d like to install; we’ll install Syncthing as an example
- Syncthing is a peer-to-peer file replication app that takes a folder of data you point it to on one machine and then sync that data to other machines
- Tipi does have the ability to expose apps as well in the event that you wish to make them available publicly however I’m not going to cover that here
- Once Syncthing has installed from the Tipi app store, click the button to view its link; Syncthing uses port 8090 within Tipi for reference; these ports are assigned when apps get added to the Tipi app store and should be the same across Tipi installs
- Now it doesn’t suffice to only have Tailscale on your host, so now you’ll want to install it on your other devices as well, then access your newly deployed Syncthing app via Tipi via the MagicDNS link (along with the port of course)
- Example: “monitoring.yak-bebop.ts.net:8090”

- Example: “monitoring.yak-bebop.ts.net:8090”
- If all goes well, the main webpage of that Syncthing instance should load
Syncthing
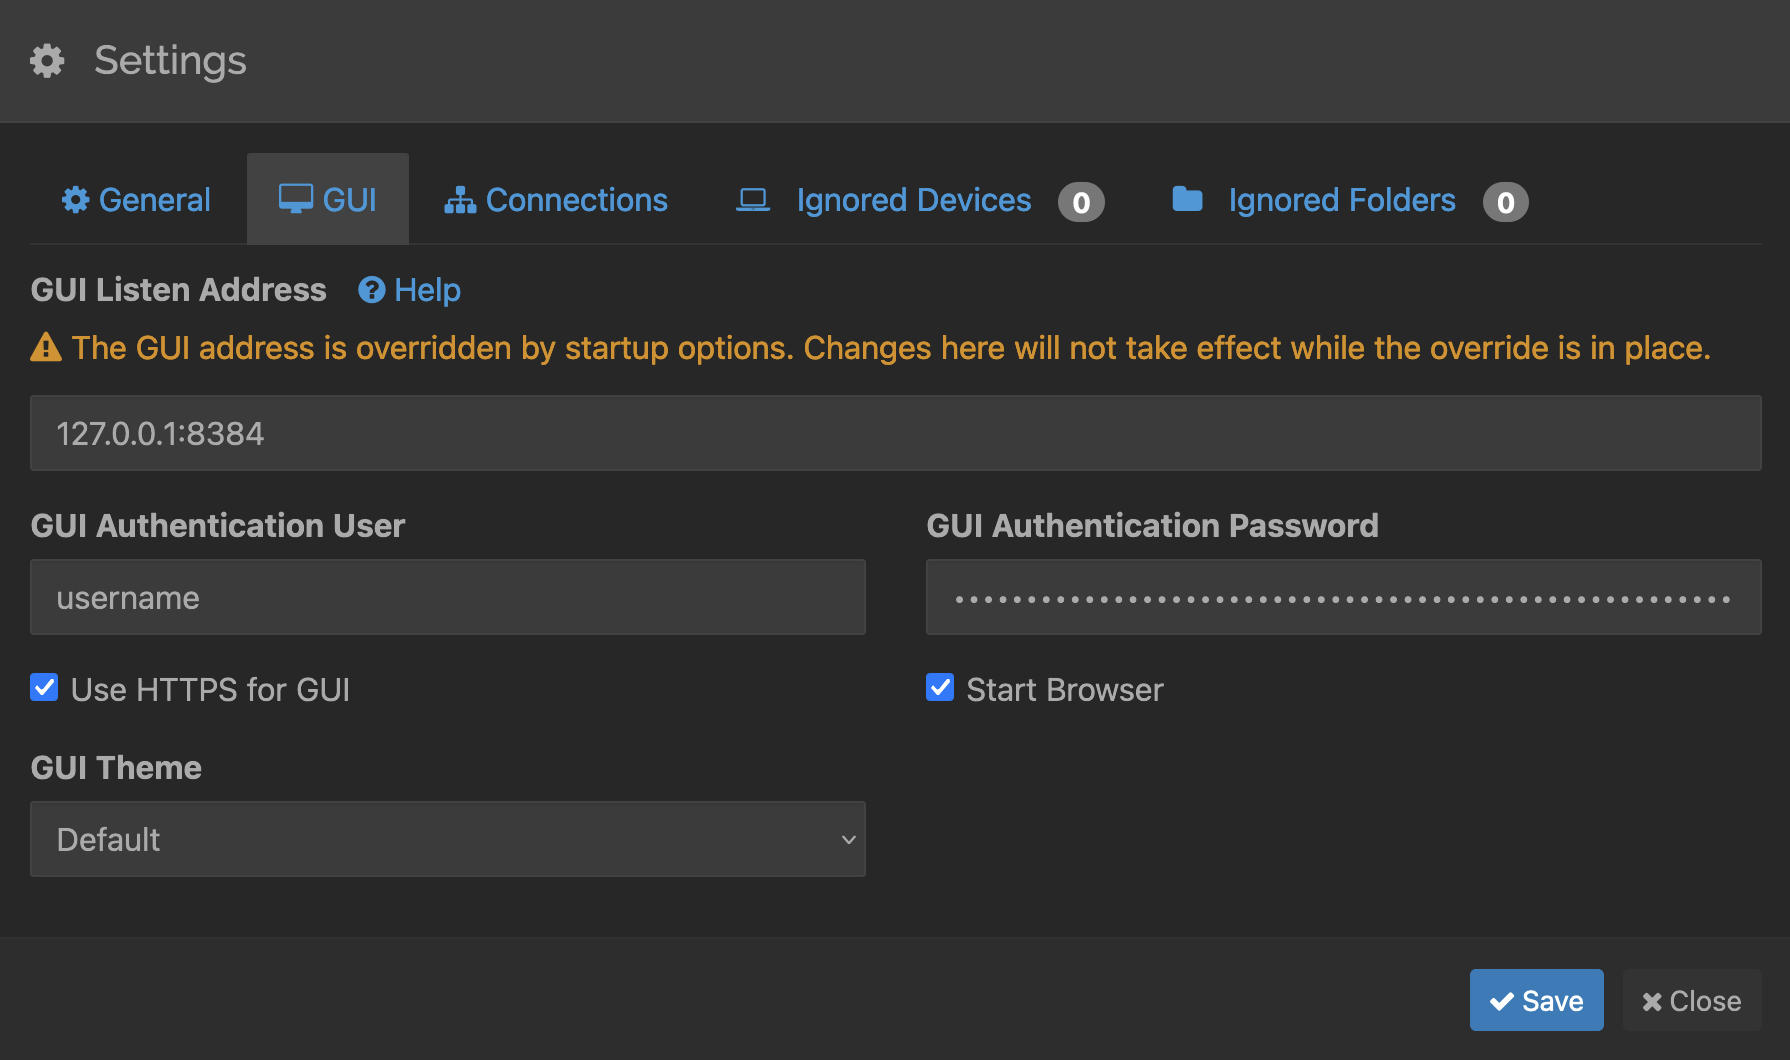
- When you first access Syncthing, you should be presented with a banner near the top of the page warning about there not being credentials for the app, you’ll want to go into its settings and setup a username/password for its webpage GUI

- Now for Syncthing to have something to sync, you’ll want to set it up on another device; for example, I have it on my MacBook Pro; grab the Syncthing device ID from the Tipi instance (Actions –> Show ID) and use it to add a remote device from your workstation; go back to the Tipi instance to accept the new device; now you have two devices ready to sync data between them
- For extra security, edit the listen parameter of the host within Syncthing from dynamic to something like
tcp://monitoring.yak-bebop.ts.net:22000then do the similar (change the host part) on the other host; this will cause Syncthing to communicate with the remote host via Tailscale; this may be overkill as Syncthing’s communication between hosts is encrypted but security happens in layers - Now we’re ready to create a folder within Syncthing that will be synced; on your workstation, click the Add Folder button then point it to the folder path where the data you want to replicate is (below: /var/syncthing/folders/test-folder)

- Move to the Sharing tab and select the other device

- Now on the Advanced tab, make sure the Folder Type is Send & Receive

- Because this is the source folder that we want to replicate, send/receive is selected so that; choosing receive only as the folder type means that the device will stay in sync with other devices but any changes locally on the device aren’t replicated out to others, useful to maintain a copy of data where changes to that data on the device aren’t expected
Uptime Kuma
- Now that you have your first darkcloud service, you’re gonna want to monitor it - Uptime Kuma does just that!
- Install Uptime Kuma from the Tipi app store, then navigate to its link (its port should be 8125); of course, you’ll want to put a username/password on it
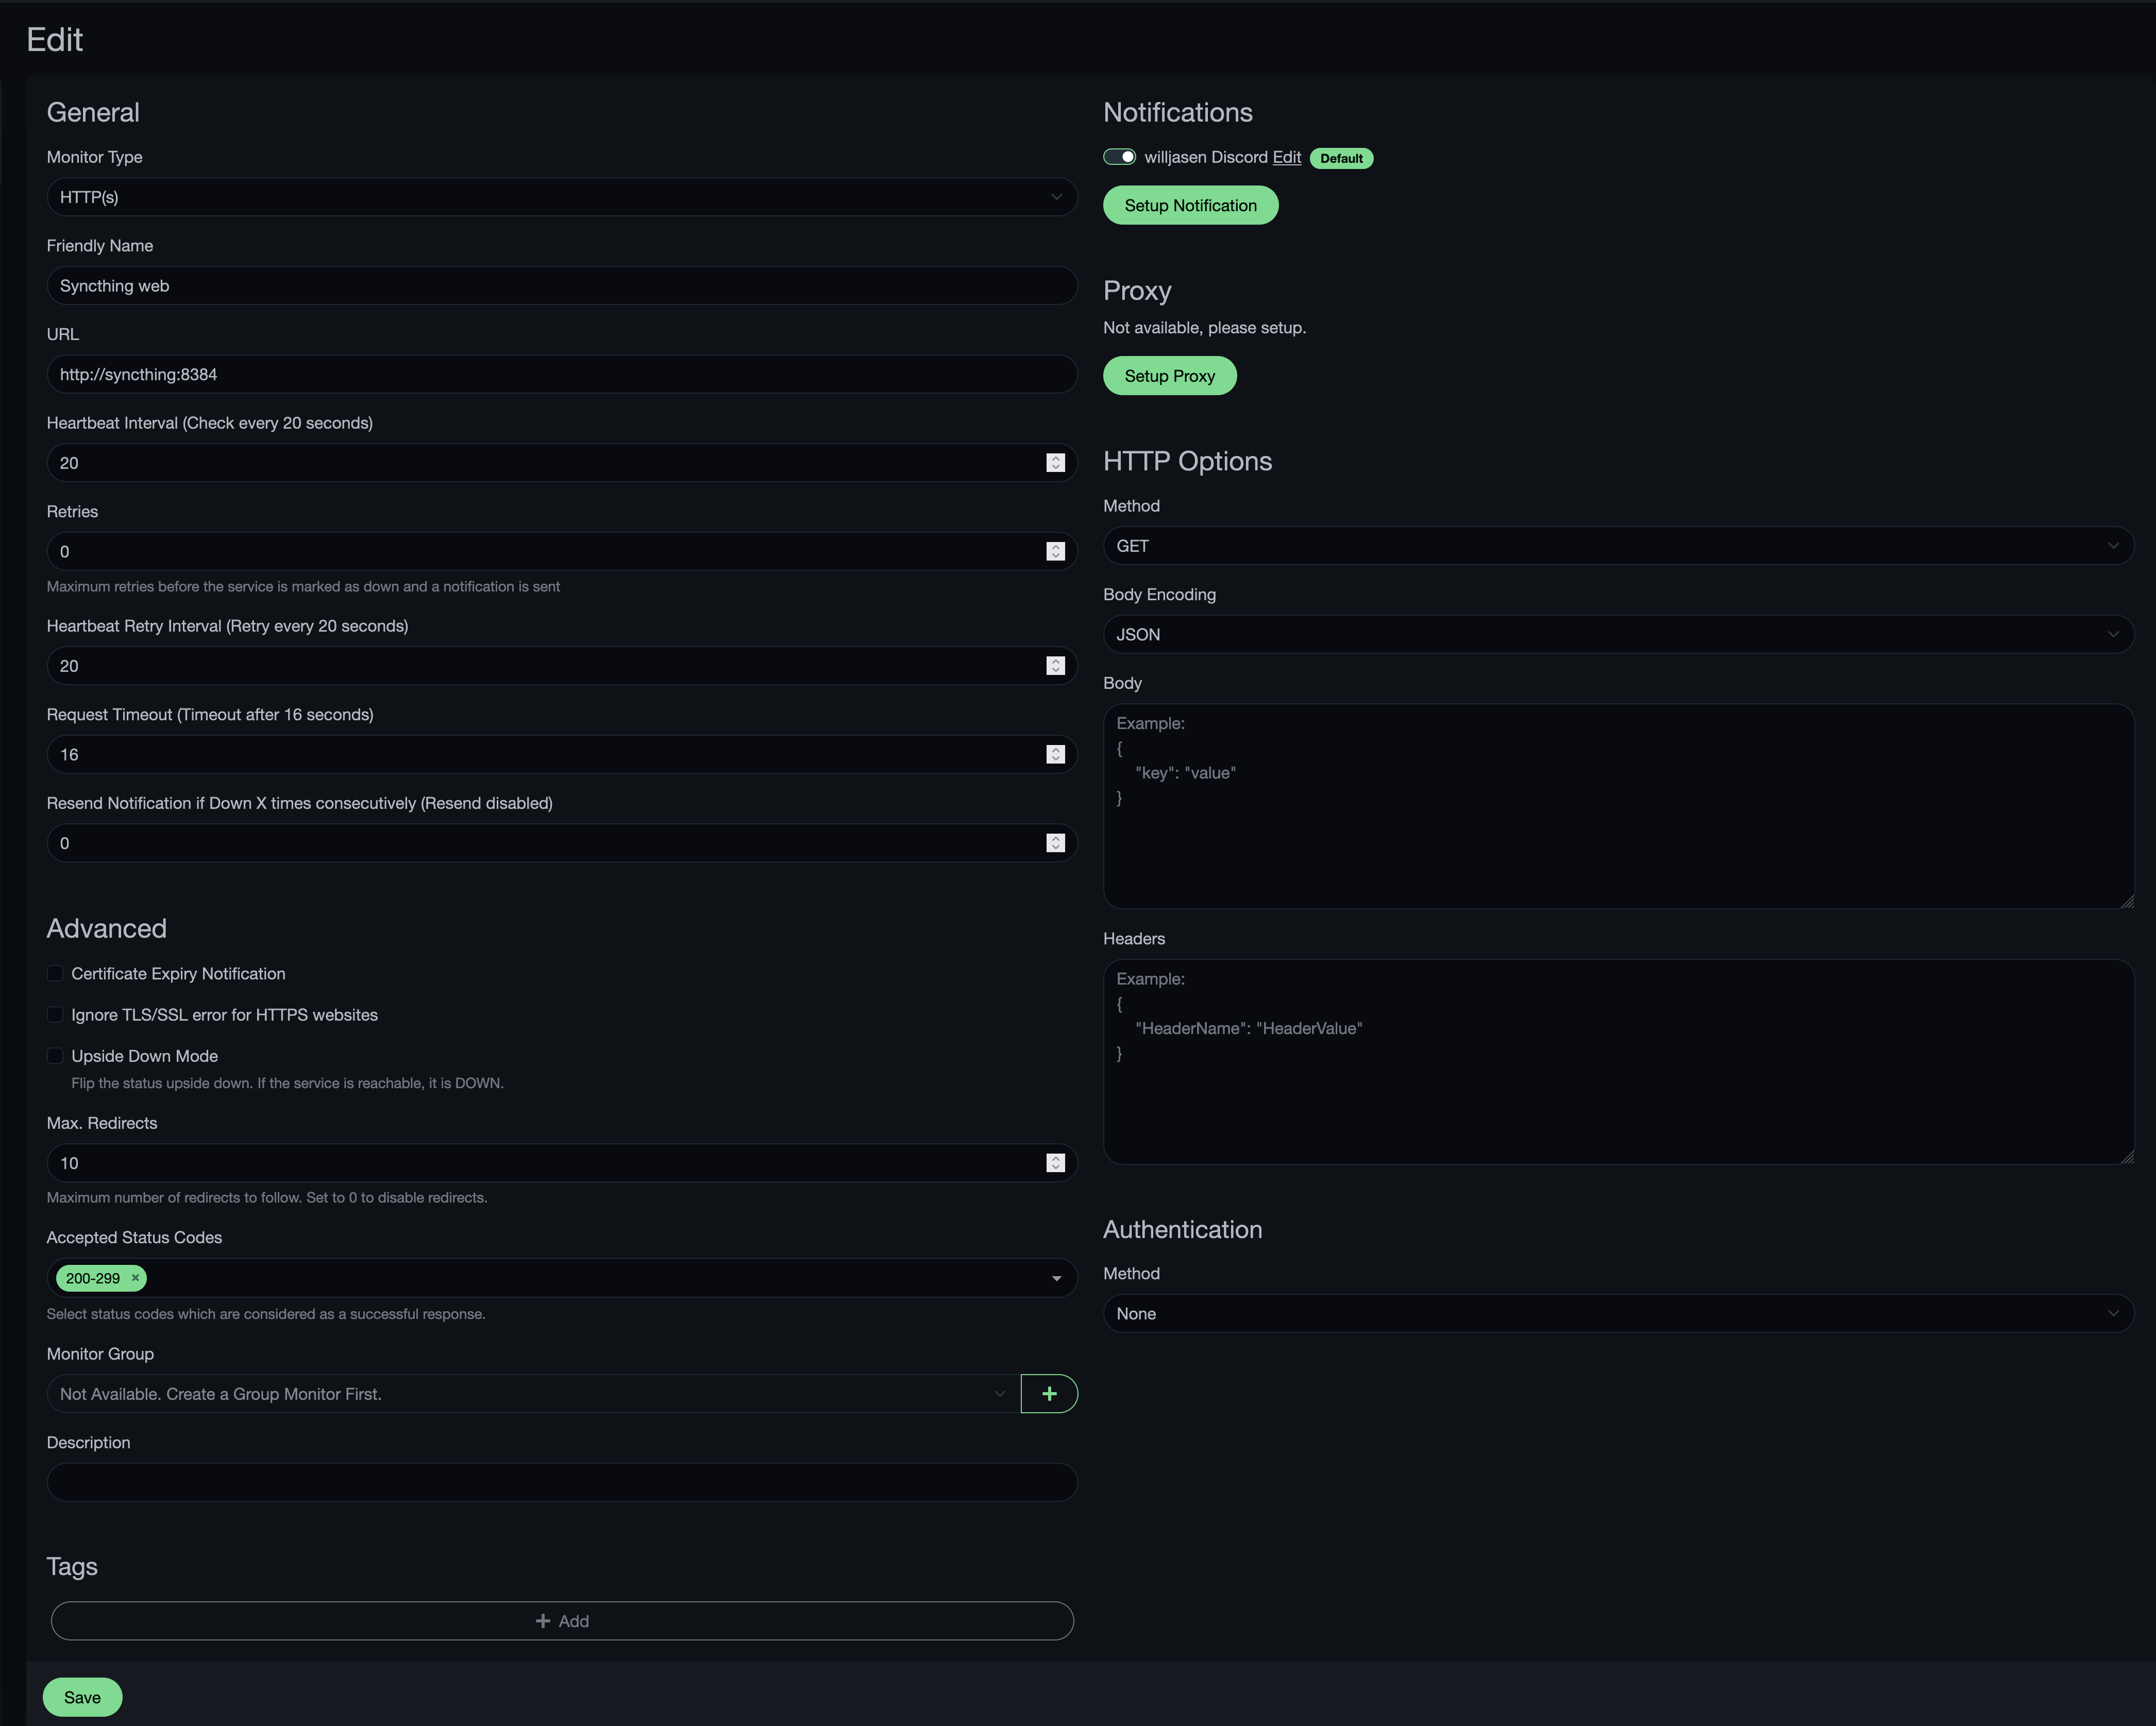
- Click the Add New Monitor button, then add the monitor as follows:

- This can be slightly confusing, but the URL hostname to use here is generally going to be the name of the app with its otherwise app-specific port; the reason for this format is that the hostname will reflect the docker instance’s name which is named after the app (as defined via the app store) and for the port in this case, 8384 is the port Syncthing typically uses for its web interface
- For some reason I have yet to discover, Uptime Kuma (and other Tipi apps) have trouble accessing the local device via Tailscale, but accessing other devices are fine otherwise
Things to Consider
- Other common apps that are available via Tipi include:
- Nextcloud (storage/voice/et. al plugins)
- VaultWarden (password vault)
- AdGuard & Pi-hole (DNS)
- Jellyfin (media)
- Homebridge & Home Assistant (home automation)
- Tailscale can poke through firewalls (most of the time) so there’s no need to open various ports on your router for the services within your darkcloud
- For good security hygiene and practices, setting up a Tailscale ACL (access control list) is recommended so that only the things you wish to be available via your darkcloud can be reached (as opposed to allow everything)
- Changing a LAN IP of a host doesn’t change its Tailscale IP, so as you may move devices around, the way you access those services via Tailscale doesn’t change
- Tailscale doesn’t provide anonymity per se; just like any other kind of IP traffic, source and destination IP addresses can be examined to determine who’s talking to who, but communication otherwise is private
- Tailscale will encrypt data-in-transit but you should also consider encrypting the data-at-rest as well (FileVault on macOS, BitLocker on Windows, LUKS in Linux, Cryptomator for file containers)
Epilogue
- So that’s it! You now have the basis for to grow your darkcloud. Add more apps at your leisure and add further hosts as resources are available
Wir sind im richtigen menschlichen Leben, das nun Programme im Hintergrund erfordert